Data Preparation
Prepare some data
This package was designed for use at Diamond Light Source. As such some assumptions have been made in encompassing scripts about file layout and information. The Diamond use case will be discussed first and then the building blocks will be explained, which should help you implement the functionality here even if your setup is different.
Note: Information on developing a test set here.
It is assumed that some processing output will have provided a directory with many structures, each of which has the following information:
- original and inverse phase files
- cell group information in a .mtz file
- space group information in a .mtz or log file
This will look roughly like:
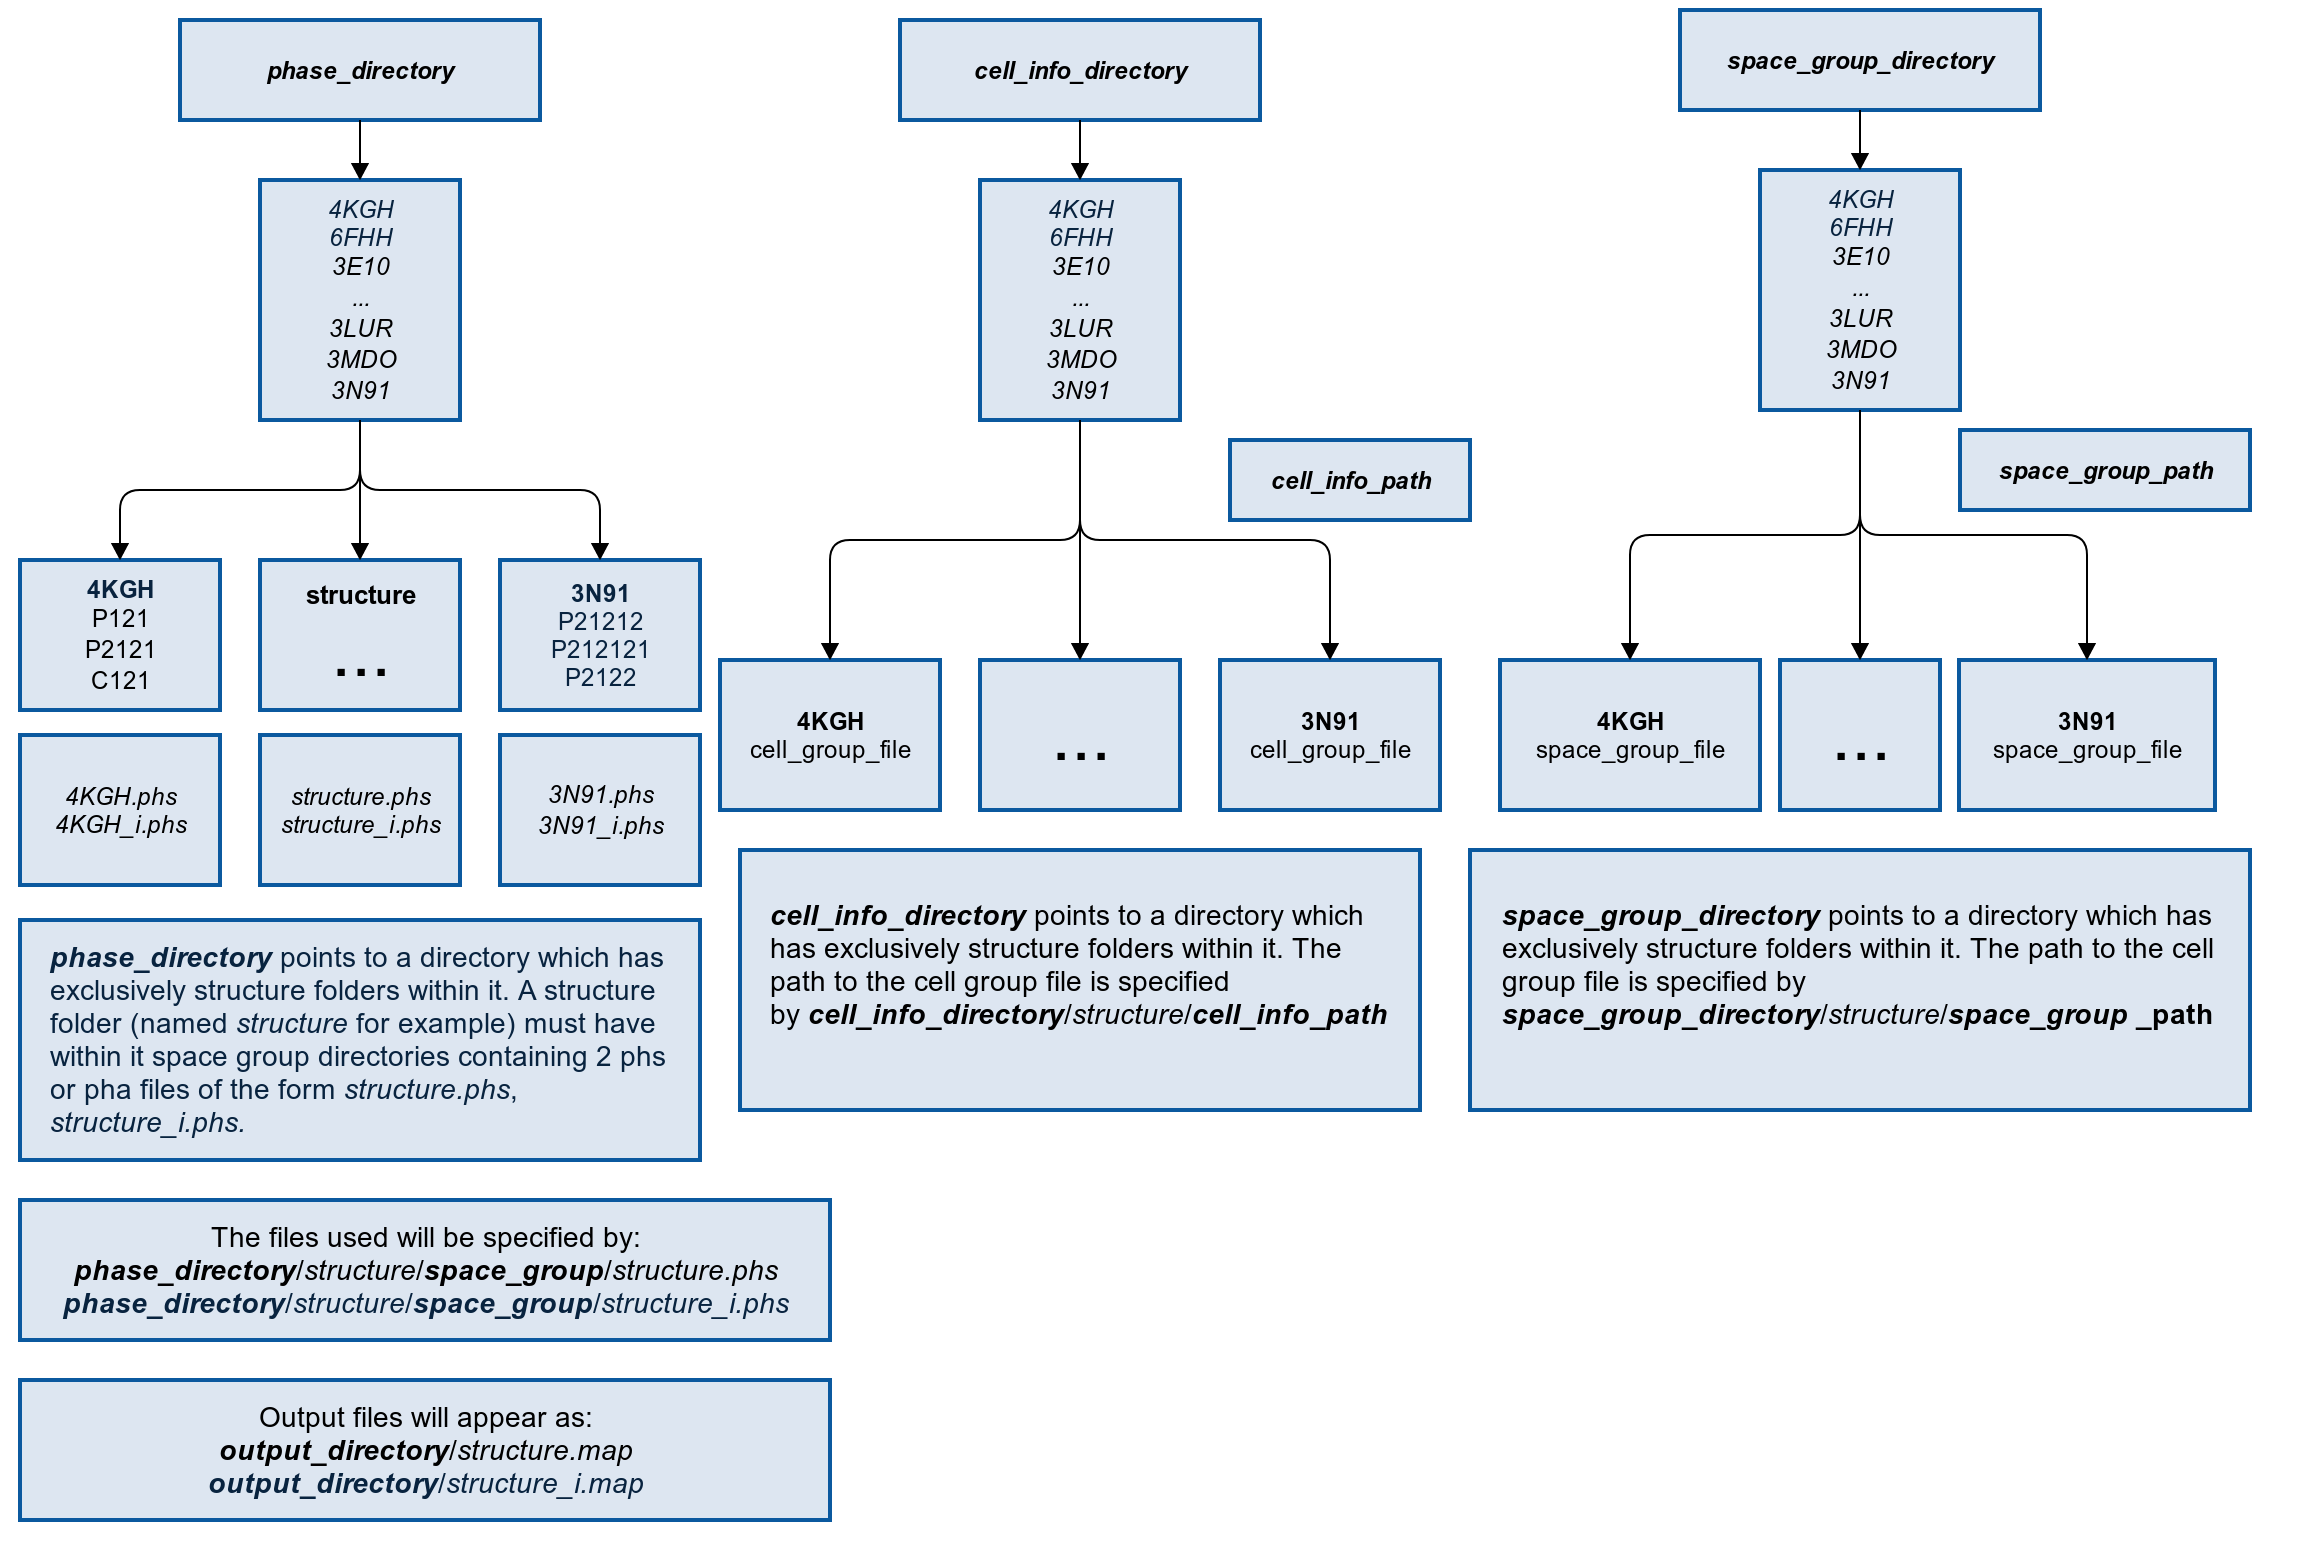
Note that this allows for the phase, cell and space information to be in entirely separate locations. The important thing is that the directories all contain the same structure directories inside them.
From there, the path to the specific files can be defined relative to the structure directories. This assumes that the cell and space files are in the same location within each structure directory.
Example: The cell info file for a structure with a PDB ID of 4PIB may be located at /scratch/ai_research/structures/4PIB/metadata/cell_info.mtz. In this case, the cell_info_dir would be /scratch/ai_research/structures and the cell_info_path would be metadata/cell_info.mtz. At runtime, this will generate the full path for each structure in the cell info directory with the pattern {cell_info_dir}/{structure}/{cell_info_path}. The same process is applied for the space group prameters.
The phase information is located by searching the structure directory for a folder which matches the best space group label found in the space group file. For example, this will be of the form “P12121”. The original and inverse phase files are both assumed to be within this directory.
From there, you must define xyz limits for the map file transformation. We used 200x200x200 and a cube is required for further transformations using provided tools here.
Each phase file will produce a corresponding .map file in a folder you can define.
You may also choose to generate labels in a database based on the CC values of the original vs inverse hand.
Finally, the maps are sliced up into 2D image files and stored in the image directory for training.
As you can see, there are many parameters necessary for this processing, so the tool provided requires a yaml configuration file input. You can generate this file now with:
topaz3.prepare --example config.yaml
which will generate a file that looks like this:
phase_dir: /phase/directory/path
cell_info_dir: /cell/info/directory
cell_info_path: cell/info/path.mtx
space_group_dir: /space/group/directory
space_group_path: space/group/path.log
xyz_limits:
  - 200
  - 200
  - 200
db_path: /db/is/here.db
maps_dir: /output/maps/directory
slices_per_axis: 20
images_dir: /output/images/directory
From here, simple change the file paths according to the specification above and trigger the data preparation with:
topaz3.prepare config.yaml --make-output
–make-output simply generates the output directories and database if it cannot find them. Leave it out to ensure only directories and databases which already exist are used.
If you want to perform the transformation but not produce results in a database, simply remove the db_path line from the config file. You may want to do this if you have already generated your labels from well processed data and now want to repeat the data preparation and training cycle on different versions of the same structures.
You can check this has worked properly by looking in the map and images directory you specified.
Within the database there should now be two tables, ai_data and ai_labels, which can be used for training.
Note: If you are not at Diamond, you may experience some issues with the shell scripts. Go to topaz3/shell_scripts and alter these such that they run on your machine/system. Most of this software is related to the CCP4 project and should be freely available.
Data Preparation Tools
Splitting a test set 
You may wish to split the data that you have into a training and test set. This helps to keep the test data separate from the AI you are developing until it is ready for testing.
Topaz3 has a tool to help, view the interface with:
topaz3.test_split -h
This is designed to work on a directory which is filled with subdirectories or files all of the same type. It will refuse to work if presented with anything else as there is too much room for an error in this case.
Applying a Filter
You may wish to apply a filter to all of your images! Some basic filters have been prepared for you and you can find instructions to filter every image in a directory with:
topaz3.filter -h
The command takes the input and output directory paths and lets you choose a filter from preprepared options.
All extra parameters to the filter function are passed in as key value pairs with an equals sign.
For example, to use the gaussian filter:
topaz3.filter /input/directory /output/directory gaussian sigma=5
To add a filter to the available list, import it to the filters module and add an entry to the available filters dictionary with a sensible name.
To use another filter, use the underlying filter_directory function from topaz3.filters:
def filter_file(
    input_file: str, output_file: str, filter: Callable, parameters: dict = {}
):
    """
    Read the input file, apply filter with expanded parameters as keywords and save in the output file location
    :param input_file: file to be filtered
    :param output_file: save output here
    :param filter: apply this filter
    :param parameters: give these parameters to filter
    :return: output file location
    """
This may also be necessary if the filter takes tuples, dictionaries etc as argument, as these are difficult to pass in from the commmand line.
Underlying Preparation Functions
Files to map
The high level conversion for a phase file to a regularized map file is as follows:
Inputs
- phase_filename - absolute file location of the phase file you wish to transform. Must be .phs or .pha
- cell_info_filepath - absolute file location of the file with cell information (lengths and angles) which will be used to calculate the transformation.
- space_group_filepath - absolute file location of the file which contains the correct space group for the phase file. Can be a .mtz or some other file.
- xyz_limits - list with three integer values which are the dimensions of the map file to be outputted.
- output_filename - absolute file location of the output file, must be in an already existing directory.
Outputs
- Ouptut file - .map file with the specified dimensions
- Temporary files - some files marked with _temp which are the files created during the intermediate steps of the transformation
- If the function ran properly, it should return True
Example
from topaz3.conversions import files_to_map
files_to_map("/location/of/phase/file/structure.phs",
             "/location/of/cell/info/cell_info.mtz",
             "/location/of/space/group/simple_xia2_to_shelxcde.log",
             [200, 200, 200],
             "/location/of/output/output.map")
Phase to map
This is the function which sits inside files_to_map and it can be accessed directly if so wished.
Inputs
- phase_filename - absolute file location of the phase file you wish to transform. Must be .phs or .pha
- cell_info - list of 6 values for the cell lengths and angles in the form [a, b, c, alpha, beta, gamma]
- space_group - string of the space group, e.g “P121”, but can also be an integer for the standard space group number. String preferred as more exact.
- xyz_limits - list with three integer values which are the dimensions of the map file to be outputted.
- output_filename - absolute file location of the output file, must be in an already existing directory.
Outputs
- Output file - .map file with the specified dimensions
- Temporary files - some files marked with _temp which are the files created during the intermediate steps of the transformation
- If the function ran properly, it should return True
Example
from topaz3.conversions import phase_to_map
phase_to_map("/location/of/phase/file/structure.phs",
             [66.45, 112.123, 149.896, 90, 90, 90],
             "P212121",
             [200, 200, 200],
             "/location/of/output/output.map")
Maps to Images
Now that you have generated all of your map files, it is necessary to slice them up into many images for training, validating and testing the machine learning model.
This is a relatively easy process, although it can take some time. By default, the program will display output to the terminal to let you know it is working.
python topaz3/maps_to_images.py --help
usage: maps_to_images.py [-h] [--slices SLICES] [--quiet] [--test]
                         maps_directory output_directory

Converts directory of map files to image slices.

positional arguments:
  maps_directory    directory which contains map files
  output_directory  directory to output image files to

optional arguments:
  -h, --help        show this help message and exit
  --slices SLICES   optionally specify the number of slices per axis,
                    default=20
  --quiet           no terminal output during healthy execution
  --test            run test of sphere with graphical output
The number of slices per axis is defaulted to 20. This will generate 60 images for each map in the output_directory file.
The function itself is implemented like this:
def directory_to_images(
    input_directory: str,
    slices_per_axis: int,
    output_directory: str,
    output: bool = False,
)